ZOOM Verification Token: from zoom marketplace
- nia

- Sep 24, 2020
- 2 min read
Updated: Sep 28, 2020
Recently zoom has updated its developer market place. with the improvements comes new steps to generate your Token (Webhook).
Within zoom, the Webhook Only option is used to receive event-based notifications for Zoom account events.
In this section we walk you through a quick and convenient way for you to generate your zoom webhook token, required to monitor your zooms room and users within visibilityOne.
In this post we’ll tell you where you need to go and the information you will need.

Generating your zoom token
first, you’ll need administrator access to your zoom account. if you are the administrator, great, let's keep going!
(NOTE: zoom requires you to have a paid zoom account to create your token)
app webhook token details
open your browser from your desktop, then go to https://marketplace.zoom.us
Sign In and agree to terms and conditions

1. Click on develop menu and select “build app”

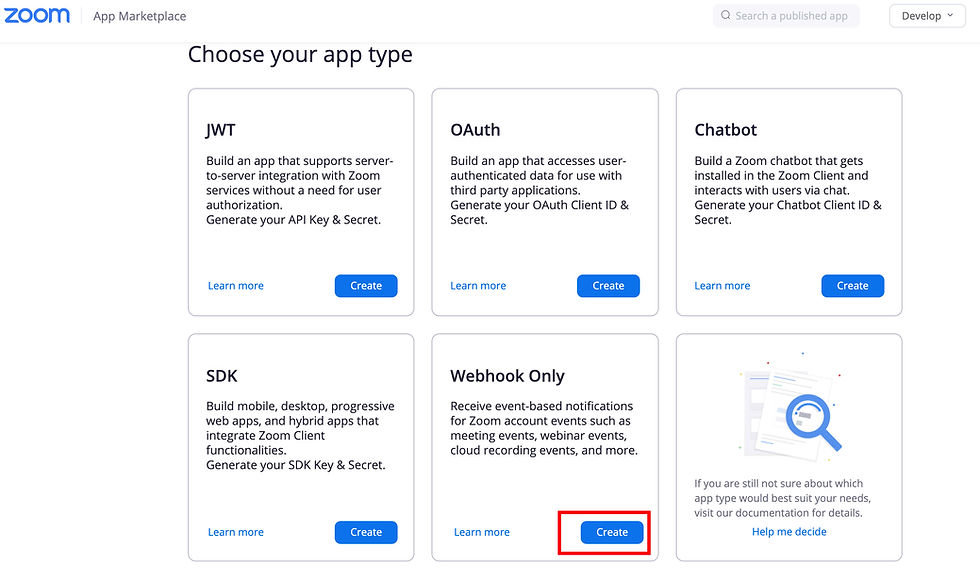
2. Chose your app type. Click on the "Create" button within the Webhook Only section.
3. A pop-up will appear. In the "App Name" section, type in "VisibilityOneWebhookOnly" and click the "Create" button.

4. Next, let's complete the required fields that are highlighted in red.
-In the Company Name field type: VisibilityOne-WebhookOnly
-Under the Developer Contact Information type in your full name and email address
-Click on the "Continue" button

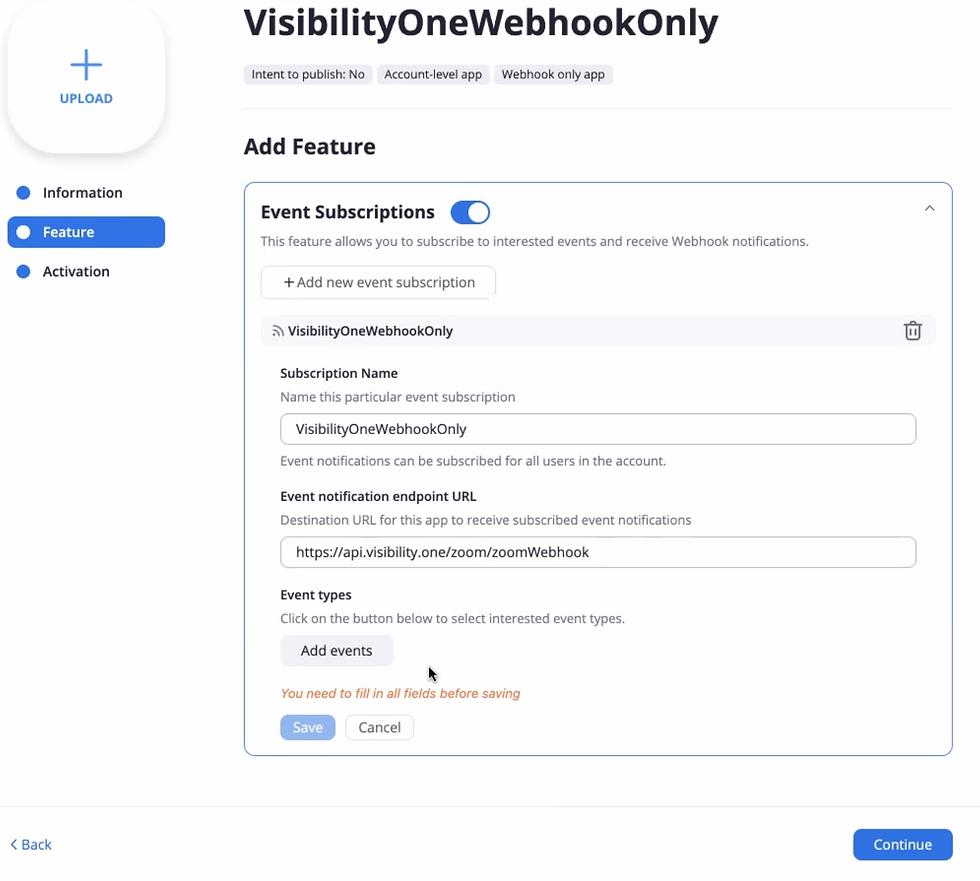
5. Enable "Event Subscriptions" and click "Add new event subscription"

6. In the "Subscription Name" field, type "VisibilityOneWebhookOnly", and in the "Event notification endpoint URL" type in "https://api.visibility.one/zoom/zoomWebhook"
Note: The URL (https://api.visibility.one/zoom/zoomWebhook) needs to be exact
7. Next, click on the "Add events" button.
8. On the left menu, click on "Meeting" and select the following events:
- Start meeting
- End meeting
- Meeting has been created
- Meeting has been updated
- Meeting has been deleted
- Meeting issues alert
- Meeting sharing started
- Meeting sharing ended

9. On the left menu, click on "Zoom Rooms" and select the following events:
- Zoom Room Alarmed
- Zoom Room Delayed Alert
- Zoom Room Checked In
- Zoom Room Checked Out

10. On the left menu, click on "User" and select the following events:
- User has been created
- User has been disassociated
- User has been deleted
- User has been activated
- User has been deactivated
- User’s profile info has been updated
- User’s settings have been updated
- User’s has accepted the account invitation

11. On the left menu, click on "Users Activity" and select the following events:
- User has signed in
- User has signed out
- User presence status has been updated
Next click the "Done" button

12. Click the "Save" button

Time to copy your Token
13. Copy your Verification Token a notepad, you will need this information for VisibilityOne. Now click "Continue"
All done :)
Note: You will be paste the Verification Token in the VisibilityOne dashboard, when enabling monitoring for your zoom rooms and users.


Comments